
Start a Circle 9 min read
How to Start a Giving Circle at Your Nonprofit
Most nonprofits that try a giving circle get the inspiring part right and the operational part wrong. The launch dinner is wonderful. Then month four arrives. Members are on a dozen different renewal dates, the chair is waiting on staff to send an update, and the circle quietly turns back into a list. This guide […]
Updated October 14, 2026 · Swell Circles

Most nonprofits that try a giving circle get the inspiring part right and the operational part wrong. The launch dinner is wonderful. Then month four arrives. Members are on a dozen different renewal dates, the chair is waiting on staff to send an update, and the circle quietly turns back into a list.
This guide covers both halves: how to design a circle people want to join, and how to set it up so it still works in year three. It assumes the nonprofit-hosted model, where your organization decides what the circle funds before anyone joins. If you’re still making the case internally, start with How to Present a Giving Circle to Your Board.
Step 1: Choose what the circle is for
Every circle starts with a purpose, and in a nonprofit-hosted circle you set it before the first member joins. There are two natural starting points.
A program. The circle funds something specific and visible: a shoreline restoration crew, a summer reading program, a scholarship fund, a new piece of hospital equipment each year.
An affinity. The circle gathers people who share something: young professionals, women leaders, alumni, volunteers, parents, a neighborhood.
The strongest circles combine the two, with an affinity group funding a program its members care about. To find yours, ask three questions:
• Which group of supporters already shows up again and again without being asked?
• Which program has a story members can see in person, not just read about?
• Can you name ten people who would say yes if the chair called them this week?
If you can answer all three, you’ve found your first circle. Start with a group you already have rather than inventing a new one.
Step 2: Recruit a volunteer chair first
A great chair can carry a circle through a slow start, and a missing one can stall a well-designed circle. Recruit one before you design anything else, because a good chair will shape the levels, the gatherings, and the first invitation list.
Your best chair is rarely your largest donor. Look for someone who is already a donor, genuinely connected in the community you’re gathering, and socially generous: the person who remembers names and makes introductions. Two co-chairs are often better than one, especially if one of them sits on your board.
Write the role down in a paragraph so it feels doable. A typical chair invites people, welcomes each new member personally, hosts or co-hosts gatherings, and shares a short update with the circle now and then. Set a 12-month term so saying yes doesn’t feel like a lifetime commitment. Pair the chair with a staff lead who owns the plan, the calendar, and anything involving money or donor records.
Step 3: Design membership levels people want to be
Levels are where a circle starts to feel like membership instead of a donation form. A few principles:
• Offer three levels. Enough to give people a choice and a place to grow, few enough to decide in a minute.
• Name levels as identities, not amounts. People would rather be a Steward than a “$100 donor.”
• Lead with benefits, not gift sizes. Each level should describe what members get to be part of, and the dues follow.
• Mix monthly and annual. Monthly dues lower the barrier for newer donors. An annual top level suits leaders who prefer one gift a year.
• Make benefits experiences, not things. A vote, a field day, a briefing with program staff, a seat at the planning table. Experiences build connection, cost little, and keep more of each dollar for the mission.
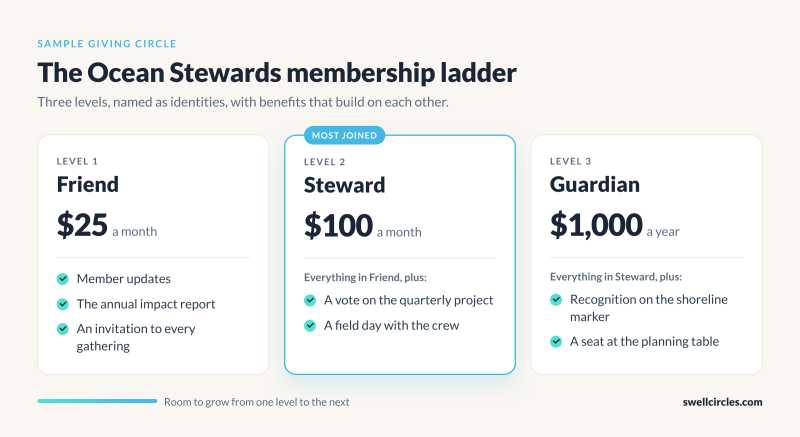
Here’s the ladder from our sample Ocean Stewards circle:
Step 4: Decide how much voice members have
In a nonprofit-hosted circle, the money is committed to your mission from day one. Whether members also get a say is up to you.
There are three common approaches:
| Approach | How it works | Best for |
|---|---|---|
| Updates only | The circle funds one defined program. Members follow its progress closely. | A first circle, or a program with a single clear need |
| Input | Members share ideas through a survey or a conversation with program staff. Staff decide. | Circles where members bring useful expertise |
| A vote among approved options | Each quarter or year, members choose among two or three projects your leadership has already approved. | Circles that want a strong sense of ownership |
You can also tie voice to level, as Ocean Stewards does by giving the vote to Stewards and Guardians. If you’re unsure, start with updates only. Adding a vote later is easy and feels like a gift. Taking one away feels like a broken promise.
Step 5: Set up the infrastructure before you invite anyone
This is the step most circles skip, and it’s the reason so many fade by month four. Before the first invitation goes out, you need:
• A join page that tells the circle’s story and lets someone pick a level in a couple of minutes
• Recurring billing that handles different levels, monthly and annual dues, and a different renewal date for every member
• Automatic receipts, card updates, and retries when a payment fails
• Renewal tracking that flags lapsing members before they lapse
• A way to email the whole circle, one level, or just the members who haven’t renewed
• Access for your chair to their own members without opening your whole database
• Clean records and reporting you can bring to your board
A spreadsheet and a payment link can cover a dozen members for a few months. After that, the gaps start costing you members.
Swell Circles is built for exactly this list. Setting up a circle looks like this:
1. Create the circle. Add its name, story, photos, and colors. Swell Circles builds a branded public page with live progress and the members already in it. Your brand leads, not ours.
2. Add your levels. Set each level’s dues, billing frequency, and benefits. Add as many as you need.
3. Connect Stripe. Dues settle directly into your own Stripe account. Swell never holds your funds.
4. Invite your chair. Chairs see their own circle’s roster and communication tools. Staff see everything.
5. Write your key emails. Customize the welcome, confirmation, and renewal emails so the moments that matter feel personal.
There’s no setup fee and no subscription, just a 2% platform fee on funds raised, with Stripe’s processing fees separate. Members can choose to cover the fees, and you can run as many circles as you like at no added cost.
Step 6: Recruit founding members before you go public
Nobody wants to join a group that looks empty. Before you announce the circle widely, quietly recruit around a dozen founding members so the join page already shows real people when the public sees it.
Work outward in this order:
1. Your board. Every board member joins first, at whatever level is right for them.
2. Your most loyal recurring donors. People who already give monthly are the easiest yes, because a circle gives them more for the same habit.
3. The chair’s personal network. These are the people your mailing list has never reached.
Make every ask personal: a call, a coffee, a text from the chair with a link to the join page. Mass emails come later. Give founding members something small and lasting, like a “Founding Member” mention in the circle’s first impact report, so they feel the weight of being first.
Step 7: Launch with a gathering
Your public launch should feel like the circle itself: small, warm, and close to the mission. Skip the ballroom. Host it somewhere members can see the work, like a program site, a classroom, or the stretch of shoreline the circle will restore.
A simple 60-minute plan:
• The chair welcomes everyone and explains why they joined.
• A program leader shows exactly what the circle’s dues will fund this year.
• Founding members introduce themselves to each other.
• The chair asks every attendee to bring one friend to the next gathering.
Send the join page link to every guest the same evening, while the feeling is fresh.
Step 8: Run the first year on a rhythm
Circles fade when communication becomes “whenever someone has time.” Put the first year on a calendar before launch:
| When | What members receive |
|---|---|
| Within 24 hours of joining | A personal note from the chair and a welcome email |
| Monthly | A short update from the work: one photo, one number, one name |
| Quarterly | A gathering, plus the member vote if you offer one |
| 30 days before each renewal | A reminder that recaps what that member’s dues made possible |
| Month 12 | A year-one impact report and a celebration |
The welcome matters most. It’s the moment a new member decides whether they joined a group or just set up a payment.
In Swell Circles, you can schedule updates in advance, send them to the whole circle or a single level, and customize the welcome and renewal emails. Renewal reminders go out on schedule automatically, and gatherings live on the circle’s calendar with an RSVP list, so the rhythm keeps going even in your busiest season.
Step 9: Renew and grow
Renewal doesn’t start at the renewal date. It starts with the welcome and builds with every update and gathering. By month 11, a member should be able to name one thing their dues made happen.
A few habits keep a circle growing:
• Catch lapses early. When a card fails or a renewal is coming up for a quiet member, have the chair reach out personally before the system sends its third reminder.
• Invite members up. A Friend who comes to every gathering is ready to hear about the Steward level. Moves between levels are also your clearest signal of future major gift potential.
• Ask every member to bring one person. A circle that grows through its members’ invitations is a circle members feel ownership of.
• Start your second circle. Once the first one is working, the same playbook works for your young professionals, your alumni, or another program. Each circle gets its own chair, page, and levels, and they all roll up into one staff view.
Your launch checklist
• Purpose chosen and approved by leadership
• Chair (and ideally a co-chair) recruited, with the role written down
• Three levels designed, with benefits reviewed for deductibility
• Decision made on how much voice members have
• Join page, recurring billing, receipts, and renewal reminders set up
• About a dozen founding members committed
• Launch gathering scheduled
• First-year communication calendar drafted
• Success measures agreed with your board
We’re onboarding early-access nonprofits to Swell Circles now, in small groups so each one gets hands-on help designing its levels, join page, and launch plan.
Keep reading
• What Is a Giving Circle? A Guide for Nonprofits
• How to Present a Giving Circle to Your Board
Sources and further reading
• Philanthropy Together, national resource for giving circles
• Heartful Women’s Giving Circle, an example of a hospital-hosted circle